- Feature Engine
- Best Practices
Feature Engine
Best Practices
Learn our best practices for building and maintaining your Chalk solution
With Chalk, the same solution can be implemented in a number of different ways. Below are some guidelines and recommended patterns for building and maintaining your Chalk solution!
Data Sources/Integrations
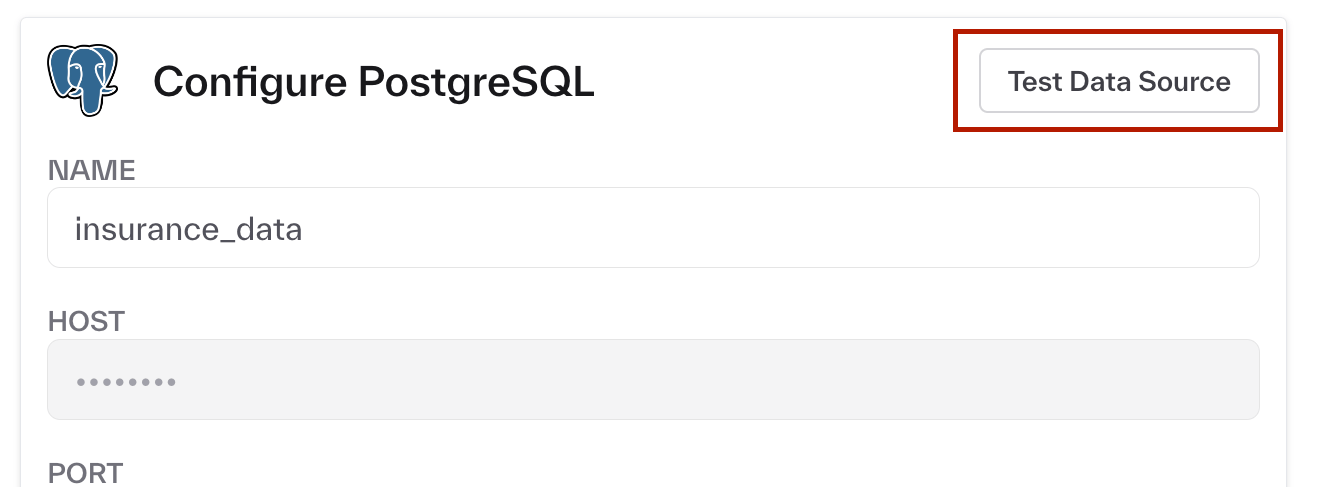
Test your data source connections
Define integrations through the Chalk dashboard and check that they’re connecting properly using the Test Data Source button.
Avoid naming your data sources by their "type", e.g. don't call your Postgres data source "postgres"
Though this works, it can lead to ambiguity in SQL resolvers when you add multiple data sources of the same type. This occurs because Chalk lets you refer to data sources by their type if you’ve only linked one data source of that type to Chalk. In general, to future-proof your resolvers, you should refer to them by their name.
Features
Start by defining your features
Features fully specify what you want your data to look like. Once you have an understanding of the inner relations, writing resolvers for your features becomes easier.
Avoid dataclass feature types, instead use separate feature classes or unpack the data
While Chalk allows for dataclass feature types, they should be avoided. They don’t always play nicely with serialization and can cause tough-to-debug errors. We recommend either unpacking the nested class into basic types or defining and joining an additional Chalk feature class if the nested component is truly a separate entity. Defining a separate feature class also makes the underlying data easier to monitor and test.
Tag and annotate your features
We strongly recommend annotating your features as you are developing them. Your feature annotations show up in the Chalk dashboard and are a good way of documenting your code. You can also add tags and owners to your features, which can be used for aggregation and filtering in the Chalk Dashboard.
from chalk.features import features
from datetime import datetime

@features
class User:
  id: str

  # the user's fullname
  # :owner: mary.shelley@aol.com
  # :tags: team:identity, priority:high
  name: str

  # the user's birthdate
  # :owner: mary.shelley@aol.com
  # :tags: team:identity, priority:high
  birthday: datetime
If you want to apply a tag or owner to all features in a feature class, this should be done in the feature decorator, like so:
from chalk.features import features

@features(owner="ada.lovelace@aol.com", tags=['group:risk'])
class User:
  id: str

  # the user's fullname.
  name: str
You can also apply restrictions or enforce feature annotation for your entire project. For instance, you can block deployment if features are not tagged or described.
Centrally manage feature-permission tags
Feature tags drive feature permissions, so the set of tags on your features is your access-control policy. Declaring tags inline next to each feature spreads that policy across your entire codebase — a large surface to audit, and an easy place for a tag to be added or changed without review.
override_feature_tags collapses that surface to a single file. Calling it switches your project into
override mode: at deploy time every code-defined tag (inline feature(tags=...), class-level
@features(tags=...), and # :tags: comments) is discarded, and the only tags that apply are the
ones in the central mapping.
# feature_tags.py — the one place that defines feature access
from chalk.features import override_feature_tags

override_feature_tags(
    {
        Transaction.raw_amount: ["pii"],
        Transaction.amount_bucket: ["cleared"],
        User.email: ["pii"],
    }
)
Because this becomes the only source of tags, a reviewer has exactly one file to read to reason
about who can access which features. Pair it with a
CODEOWNERS
rule requiring sign-off from your security or platform team on that file, and the organization gets a
single, reviewed chokepoint for feature access. Without it, any developer could grant a sensitive
feature an AllowDownstream tag from any file and self-escalate access. The override is applied over
the fully-populated feature registry at deploy time, so it is independent of import order, and you can
split the mapping across multiple override_feature_tags(...) calls within that one reviewed file.
Keep feature definitions separated from resolvers
Features should be defined in separate files from resolvers (except underscore features).
When starting your Chalk implementation, define all your feature classes in the same file
Although it can get a bit lengthy, we recommend starting by defining your features in a single file. This makes expressing joins between features easier and prevents circular dependencies.
Add Validations For Your Features
Validations for your features can prevent incorrect data from being written to your offline store. They can provide an even stricter complement to monitoring, ensuring that nothing is going wrong with the feature you are calculating.
Use implicit join syntax
Joins between feature classes can be specified in a number of different ways. We recommend using an implicit join syntax, which we cover in the join section of the docs.
Resolvers
Use SQL resolvers to read data from your raw datasets
While Python resolvers can be used to read data from your data sources, SQL resolvers are preferred. SQL resolvers allow for direct execution against your data sources and additional optimizations, making them more efficient.
Prefer Chalk expressions over Python resolvers for simple computations
# Preferred: Chalk expression
@features
class User:
    id: str
    age: int
    is_adult: bool = feature(expression=_.age >= 18)

# Avoid: Python resolver for simple computation
@online
def get_is_adult(age: User.age) -> User.is_adult:
return age >= 18Explicitly list columns in a select statement for SQL file resolvers
Select statements in SQL resolvers should be explicit. Avoid using the * syntax.
Give Python resolvers and SQL filenames clear names
Resolver names are used in the Chalk dashboard to identify resolvers. They should be clear and concise.
Make sure your resolvers operate inside a single feature space
Resolver inputs and outputs must belong to the same feature class, but joins can allow resolvers to connect data between feature classes.
Transform your Chalk DataFrame to Pandas or Polars
Don’t worry about converting Chalk DataFrames to Pandas or Polars in a Python resolver—the transformation is cheap. We use arrow (and so do Pandas and Polars) so moving data from a Chalk DataFrame to either is close to free
Querying
Run simple queries with the Chalk CLI, for more flexibility use one of Chalk's API clients
The Chalk CLI should be used to run simple online queries. For more complex use cases, you should use one of Chalk’s API clients.
Run large queries asynchronously
When sending large or long-running queries, use
run_asynchronously to set up one Kubernetes pod per input,
separate from your production and branch servers. You can configure resources for asynchronous offline queries in your
dashboard settings. You can also terminate asynchronous queries through the dashboard by terminating the pod or
canceling the query within the dashboard, which is not possible for synchronous queries.
Create named queries for your commonly executed queries
With Chalk, you can alias your complex queries using a NamedQuery. Named queries help simplify and document your
query patterns.
To define a named query, add a NamedQuery object to your Chalk deployment:
from chalk import NamedQuery
from src.models import User

NamedQuery(
    name="fraud",
    input=[User.id],
    output=[
        User.email_age_days,
        User.denylisted,
        User.credit_report.flags,
    ],
    tags=["team:fraud"],
    staleness={
        User.credit_report.flags: "30d"
    },
    owner="jodie@chalk.ai",
    description="Primary fraud model for signup",
)
Running chalk apply makes the query name available as an alias for executing your more complex queries.
For instance, running:
chalk query --in user.id=1 --query-name fraudis equivalent to running the more complicated:
chalk query \
  --in user.id=1 \
  --out user.email_age_days \
  --out user.denylisted \
  --out user.credit_report.flags \
  --staleness user.credit_report.flags=30d \
  --tag team:fraud
This feature is also accessible in all of our API clients through the query_name parameter.
For instance, in python, you can run:
from chalk.client import ChalkClient

ChalkClient().query(
    input={"user.id": 1},
    query_name="fraud",
)
To see all the named queries you’ve defined in your current active deployment, you can run:
chalk named-query listIf you want to create multiple versions of a similar queries, you can use the version parameter of the NamedQuery object and the query_name_version parameter of our various clients.
Deployment
Customize your Chalk project with configuration files
Chalk expects to find a chalk.yaml file in your project’s root repository. This file stores configuration for your
deployment (such as your Dockerfile and Python requirements). You can find a sample Chalk project repository
structure and more details in our configuration documentation. You’ll also find details on how to
exclude files from your deployment with .chalkignore.
Code changes should be tested and queried on the branch server.
Use the branch server to test that your deployments and new features are behaving as expected.
Use the @before_all decorator to configure global variables for your resolvers
Global setup for resolvers should be done through a function decorated with the @before_all decorator. This also allows for unique setups for different environments.
Custom files such as machine learning models are accessed with the TARGET_ROOT environment variable
To access files packaged in your chalk deployments, use the TARGET_ROOT environment variable to fully specify the path to your files.
For instance, if you have the following directory which you are deploying to Chalk:
example/
├── chalk.yaml
├── features.py
├── model.joblib
└── resolvers.py
You would access the model.joblib file as follows:
import os
model_file_path=f"{os.environ['TARGET_ROOT']}/model.joblib"Observability / Testing
Set up monitoring on your most important features and resolvers early
Monitoring helps you catch tricky bugs early and gives you guarantees about the data you are generating and serving. You should configure monitoring for your important features and resolvers early in your implementation.
Unit test your resolvers to make sure they're functioning as expected
Chalk makes it easy to set up unit tests for your resolvers using Pytest or any other python testing framework.
Improve CI/CD in your Chalk repository using our GitHub Actions workflow
Chalk has a GitHub Actions integration—you can use it to create branch deployments or run queries as part of your code development cycle.
Security
Generate and use access tokens to set and restrict the permissions for your different users
Scope your Chalk user permissions with access tokens. These can be programmatically generated through Chalk clients or in the dashboard. Give your users only the permissions they need.